
How to Install Windows 11 on a Lenovo laptop
Thinking of upgrading to Windows 11? Here's a short guide on how to do exactly that, whether you want to use Windows update or perform a clean install. This guide is specific to Lenovo laptops. Alternatively, we have a video version of the guide.
Windows 11 Required Spec
These are the current specifications for Windows 11, these will change in the future so check Microsoft's website for more details.
Processor: 1 gigahertz (GHz) or faster with 2 or more cores on a compatible 64-bit processor or System on a Chip (SoC). Processor Compatibility list
RAM: 4 gigabyte
Storage: 64GB or larger
System Firmware: UEFI, Secure Boot capable. Check here for information on how your PC might be able to meet this requirement.
TPM: Trusted Platform Module (TPM) version 2.0. Check here for instructions on how your PC might be enabled to meet this requirement.
Graphics Card: Compatible with DirectX 12 or later with WDDM 2.0 driver.
Display: High definition (720p) display that is greater than 9” diagonally, 8 bits per colour channel.
Internet Connections & Microsoft account: Windows 11 Home edition requires internet connectivity and a Microsoft account.
Switching a device out of Windows 11 Home in S mode also requires internet connectivity. Learn more about S mode here.
For all Windows 11 editions, internet access is required to perform updates and to download and take advantage of some features. A Microsoft account is required for some features.
Whilst there may be unofficial ways to install Windows 11 on older hardware, this guide is not focused on that.
Option 1: Installing with Windows update
You have two options when updating to Windows 11, this option involves using Windows Update. It's the easier of the two and you don't have to do much. All of your data should be safe this way but just in case we reccommend you perform a backup of your data.
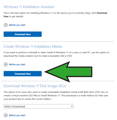
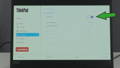
If your system is compatible, it may be possible to upgrade from Windows 10 to Windows 11 through Windows Updates. Simply access the Windows Update section of the settings menu, and look for an option to upgrade to Windows 11.
If the option does not appear, download and install the PC Health Check app from Microsoft’s website.
Run the app and select “Check now “ under the Windows 11 section. The app should tell you whether or not your system can run Windows 11. If there are compatibility issues, you will not be able to install Windows 11 officially until any issues have been resolved. If you are running Windows 10, don’t worry as it will still receive support until October 2025.
Once you have Windows 11 installed, you will have 10 days to revert back to Windows 10 if you change your mind. All new data form after the installation should carry backwards if you choose to downgrade. If you decide to downgrade after the 10 days you will need to complete a clean install of Windows 10.
Option 2: Clean install
Option 2 is a clean install of Windows 11. Any data on the system and on the installation media tool you will create during this process, will be deleted. We recommend you create a backup of all your data to a seperate device.
Part 1: Prepare what you'll need
You will need a Lenovo laptop, a compatible charger and a USB that is at least 8GB.
Use Microsoft's free Windows 11 Installation Media tool, to create a Windows 11 boot USB. Run the tool and follow the on screen instructions.
Once the USB has been created using the tool, make a new folder (Call it “Lenovo Drivers” to be simple, you can use other names, as long as it does not clash with any folder name that's already there); this folder is intended to hold the optional drivers for you to install later.
Optional: Downloading Drivers
After Windows 11 has installed you will need to update your device's drivers using Windows Update & Lenovo Vantage. Sometimes some drivers may get lost during the update process such as the wifi driver so you might not be able to connect to the internet afterwards. Before you update it's best to download those drivers just in case, especially if you don't have another device that you can use afterwards to troubleshoot.
Once the USB has been created using the tool, make a new folder (Call it “Lenovo Drivers” to be simple, you can use other names, as long as it does not clash with any folder name that's already there); this folder is intended to hold the optional drivers for you to install later.
Use the Lenovo website, you can access this through Lenovo Vantage, to download the wifi drivers specific to your device. Once downloaded, move them to the 'Lenovo Drivers' folder on your USB.
Skip this step if your laptop does not have a dedicated graphics card. Download the graphics driver into the folder where applicable. For NVIDIA graphics cards, goto NVIDIA's website & download the graphics driver (select the graphics card model; e.g. on ZBook Studio G7 it would be: Quadro > Quadro Series (Notebooks) > Quadro T2000.
(Direct link: https://www.nvidia.co.uk/Download/index.aspx?lang=en-uk)
Part 2: Backup your data
As we are performing a clean install of Windows 11, the drive Windows is installed on will be wiped of any data, so make sure to backup any data you wish to keep on either a removable drive or in cloud storage.
Part 3: Check AC Charger, Soft Power Reset, Reset BIOS to default
Step A: Turn the laptop on, insert the charger and reset the laptop. If you receive a message stating that the charger is incompatible, we recommend using a different charger to see if the message persists (this message can appear if the charger you are using is an inadequate wattage.
Step B: Remove the AC charger from the Laptop (and where applicable, also remove the battery). Now, press down the power button for 30 seconds. Then, connect the AC charger in without reconnecting the battery.
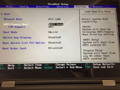
Step C: Turn on your laptop. Once you are booted into the operating system, hold the power button on the system (Do not shutdown from Windows). Turn on your laptop again, and press the Enter key when prompted. Follow the on-screen instructions to enter the BIOS (this is usually the F1 key). When you are in the bios, press F9 to load default settings, then navigate to Restart > Exit Saving Changes.
Part 4:
While previous versions of Windows could run in Legacy, Windows 11 requires your system to be running in UEFI to be compatible. More modern machines may not support Legacy mode and only UEFI anyway.
Re-enter the bios. Change these settings in the following order.
1: Startup > “UEFI/Legacy Boot” to “UEFI Only”
2: Security > Security Chip > TPM Enable
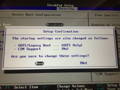
3: Security > Secure Boot > Change “Secure Boot” to “Enabled”
(there will be an additional confirmation box if this is changed from Legacy, accept this as well)
4: Startup > Boot > Ensure that your boot drive is the highest on the list
(This is usually the name of your SDD/HDD)
Restart > “Exit Saving Changes” or Press F10 for Save and Exit

Part 5: Install Windows
-Insert the Windows 11 USB you’ve made into your laptop
-Shutdown your PC, and while restarting it, press Esc until you enter the Startup Menu. Select your Windows 11 USB from this menu
-Follow the onscreen instructions to install Windows 11 (Make sure to delete the files on the drive containing the previous Windows installation)
Part 6: After Windows has been installed
Once you're in Windows:
Step A: Install the graphics drivers first. Initially, the system will appear to be less responsive / the internet appears slow.
This is because it is updating the drivers in the background. An idea is to leave the laptop for 10-15mins whilst it sets up (depending on your internet speed this could take longer). Install the wifi driver if you can't connect to the internet and you cant see the driver in device manager.
Step B: Open "Windows update", select update if it doesn’t automatically do so, and let it find more drivers (restart once it requests).
Step C: Open the Windows Store and download “Lenovo Vantage”, use it to install the remaining updates automatically.
Step D: Open Windows’ Device Manager (either by searching for Device Manager in the search bar, or by holding the Windows Key and pressing X and choosing Device manager) and check if there are any devices missing under “Other Devices”.
If any devices still do not have drivers, search for the drivers manually on the Lenovo website.
Did you know we sell refurbished tech? We sell mostly refurbished laptops from all the major brands, Lenovo laptops, Dell laptops & HP laptops just to name a few. We are looking to increase the range of products that we offer in the future to include things like refurbished phones. We pride ourselves on the quality of the service we provide and the products we sell. For more information go to about us or check out our current stock.